
Last year, I learned the hard way that buying travel insurance and getting paid by it are two completely different things. My connecting flight from Paris got cancelled, my luggage went missing somewhere over Amsterdam, and the hotel charged me for an extra night I didn’t even stay.
When I filed my claim, I was confident — I had all the right coverage. But the insurer rejected half my expenses, simply because my “proof” wasn’t strong enough. Blurry receipts, scattered emails, and missing timestamps don’t stand up against corporate claim departments.
That’s when I realized: the real secret to getting your full payout isn’t just the policy — it’s your documentation system.
Every year, thousands of valid travel insurance claims are denied due to weak documentation — especially for solo travelers and low-ticket trips.
Since then, I’ve built a simple digital process that tracks every receipt, incident, and confirmation automatically — and it’s worked flawlessly. My last two travel claims were approved without a single follow-up question.
In this guide, I’ll show you exactly how I do it — the same tech-first documentation strategy that guarantees your travel insurance payout. Think of it as turning yourself into your own claim auditor — organized, fast, and impossible to dispute.
Establishing the Digital Receipt Capture Workflow (The Foundation)
The first mistake most travelers make? Treating receipts like afterthoughts. A crumpled piece of thermal paper in your backpack won’t hold up when an insurance adjuster reviews your claim two weeks later. If you want a fast, full payout, you need a digital-first system — one that captures, sorts, and preserves every expense in real time.
This is the exact process I use.
The Power of Specialized Expense Apps
Relying on your phone gallery or wallet is a fast track to missing documentation. Instead, you need apps built to extract and structure data — not just store images.
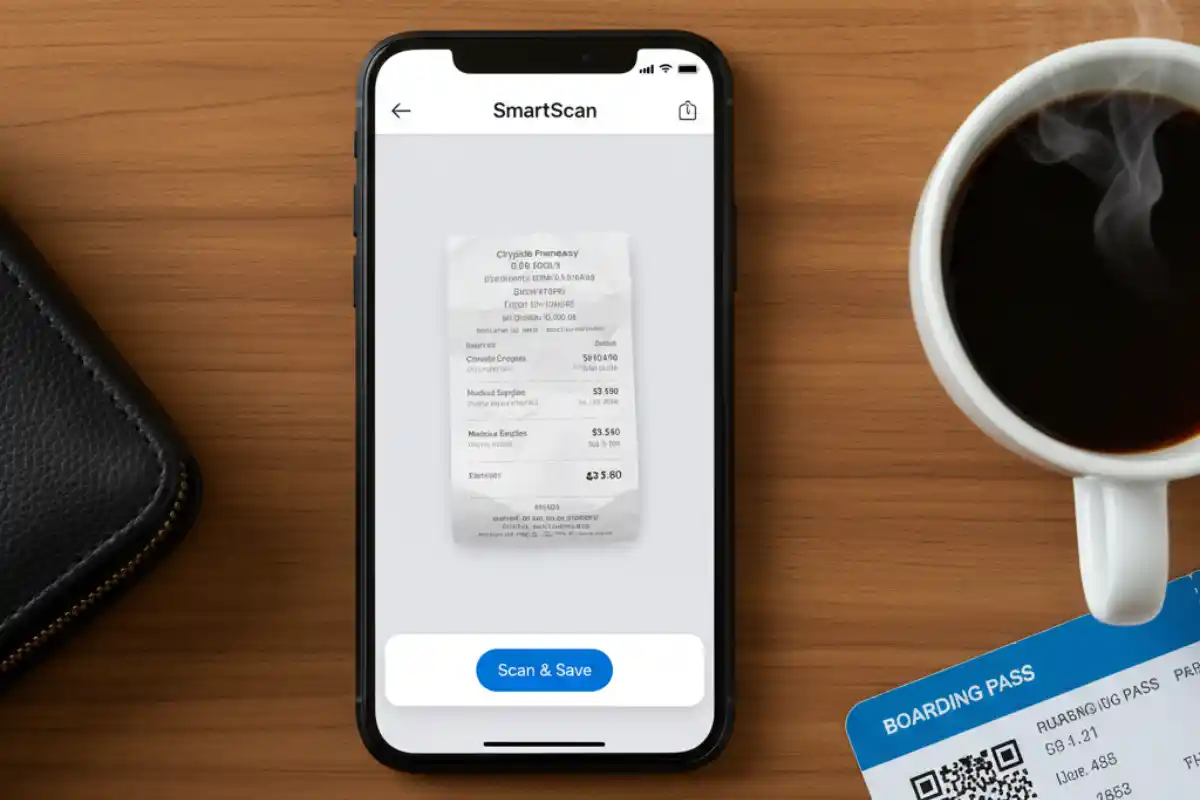
Expensify: My Go-To for Live Receipt Capture
Expensify’s SmartScan is game-changing. You snap a photo of a receipt, and it automatically reads the vendor, date, and amount using OCR (optical character recognition). No manual typing. Just verify and save.
But here’s the real trick: I create a custom “Insurance Claim” tag inside Expensify. Every time I scan something travel-related — a taxi, medicine, even a charger — I tag it. When it’s time to file, I can instantly filter and export everything with that label. No chaos. No guesswork.
Shoeboxed: My Backup for Big-Ticket Purchases
For longer trips or valuable gear (think laptops, cameras, noise-canceling headphones), I store receipts in Shoeboxed. Why?
- Its scans are IRS-compliant — clear, high-resolution, time-stamped.
- It offers long-term cloud storage.
- Perfect when you need to prove ownership of a high-value item that got lost or damaged.
Insurance adjusters care about clarity. These apps deliver it.
Digital Proof Quality: Beyond the Snap
A photo of a wrinkled receipt taken under airport lighting won’t cut it. Adjusters need clean, legible, date-marked evidence. That’s where scanner apps come in.
Don’t Use Your Camera — Use a Scanner App
Apps like Adobe Scan (or Genius Scan) automatically crop, enhance, and save your documents as high-contrast PDFs. They’re sharp, searchable, and professional — exactly what claim processors expect.
The Naming Convention That Saves Me Hours
I never name files “receipt1.jpg” or “scan.pdf.”
Instead, I use this format:
20251011_FlightDelay_Delta_376USD.pdf
This single habit has saved me hours during claim compilation. With date, incident type, vendor, and amount right in the filename, I can sort, filter, and merge documents fast.
Remember: a well-documented claim isn’t just about receipts — it’s about making life easy for the adjuster.
Incident Documentation: Building the Digital Audit Trail
Most travelers focus solely on receipts — and that’s where half of all claims go wrong. Insurance adjusters don’t just want to see what you paid; they want to understand what happened, when it happened, and how you responded. This is where incident documentation becomes your strongest ally.
Let’s walk through how I structure and capture non-receipt proof that makes my claim bulletproof — even when things get messy on the road.
Geo-Tagged and Time-Stamped Evidence
When something goes wrong — lost luggage, a theft, or a minor accident — your first instinct might be to snap a quick photo. That’s good. But with one small tweak, you can make it indisputable proof.

I always keep location metadata enabled on my phone. That means every photo I take is automatically embedded with EXIF data — time, date, and GPS coordinates. If I need to prove I was at a specific terminal at 4:32 PM when my luggage disappeared, the image metadata handles that for me.
Pro tip: don’t crop or screenshot these photos before submitting. It strips the metadata. Instead, upload the originals directly into your documentation folder.
These subtle details — time-stamped, location-verified — give your claim undeniable credibility.
Critical Official Documentation: Capture and Store
Receipts aren’t enough when it comes to missed flights, damaged items, or medical emergencies. Adjusters rely on official third-party documents to validate events. Here’s what I never leave out:
- PIR (Property Irregularity Report): If your baggage is delayed or lost, ask the airline for this immediately. Without it, most luggage-related claims get denied outright.
- Delay or Cancellation Letters: Airlines are usually willing to issue a formal statement if your flight is significantly delayed or cancelled. It only takes five minutes to request, but it could validate hundreds of dollars in hotel or food reimbursement.
- Medical Reports: Even for minor treatments abroad, always get a printed and signed medical note or hospital bill — with diagnosis and doctor’s name. Many hospitals now offer digital PDFs, so always ask.
As a habit, I scan hard copies using Adobe Scan the moment I receive them. If I don’t, they either get smudged, lost, or buried in my bag. This small habit alone has saved me from multiple rejections.
The Power of Docs: Creating a Master Incident Log
This is my personal favorite technique — and one I’ve never seen most travelers use.
I maintain a running incident log in Google Docs (you can use Word too). Think of it like a journal, but audit-ready. Every event gets logged with:
- Time and date
- What happened
- Whom I spoke with
- Reference numbers or receipts
- Any relevant notes
Here’s a real example from my last trip:
10:32 AM – Spoke to Delta counter rep (Angela). Flight DL 47 delayed due to mechanical issue. Issued Delay Letter ref. #DL2038. [Linked: DelayLetter_DL47.pdf]
Even better — I hyperlink each entry to its related proof: photos, receipts, PDFs. So when I submit the claim, the adjuster isn’t hunting for anything — it’s all connected and traceable.
Over time, this “Master Log” becomes the spine of my claim file. And more often than not, I don’t even get a follow-up question. The documentation speaks for itself.
Claims Adjuster Insights: The Payout Maximization Strategy
Here’s a truth most travel insurance buyers never hear: claims adjusters are trained to find gaps — not because they want to deny you, but because their job is to validate what’s provable.
So if your submission raises even small red flags (like missing receipts or timeline inconsistencies), expect delays, reductions, or outright denials.
To get your full payout, you need to think like an adjuster before you ever submit. Here’s how I do it.
Check also: Mark Zuckerberg Defends Meta’s Acquisitions of Instagram and WhatsApp in Antitrust Trial
The ‘Proof of Loss’ Hurdle
This is one of the most common deal-breakers in travel insurance claims — especially for lost or stolen personal items.
Let’s say your $1,200 tablet goes missing from your checked luggage. If you don’t have the original purchase receipt, most insurers won’t just take your word for it. Instead, they’ll apply depreciation, which could drop your payout by 30–60% — or more.
Here’s how I protect against that:
Secondary Proof Options I Always Keep:
- Credit Card Statements: Your bank history acts as a timestamped purchase trail — even if you’ve lost the original invoice.
- Old Photos with Metadata: Ever taken a photo of your travel bag showing that item inside? That can help. I always keep images with EXIF data (timestamp/location) as backup.
- Online Order Confirmations: Amazon or Best Buy order history can serve as accepted proof for many insurers.
Remember, adjusters aren’t looking to catch you — but they do need to justify every payout internally. The more traceable your ownership, the stronger your case.
Why Claims Get Denied (And How Tech Fixes It)
Even if your coverage is rock solid, here’s where most people still lose out — claim submission discipline.
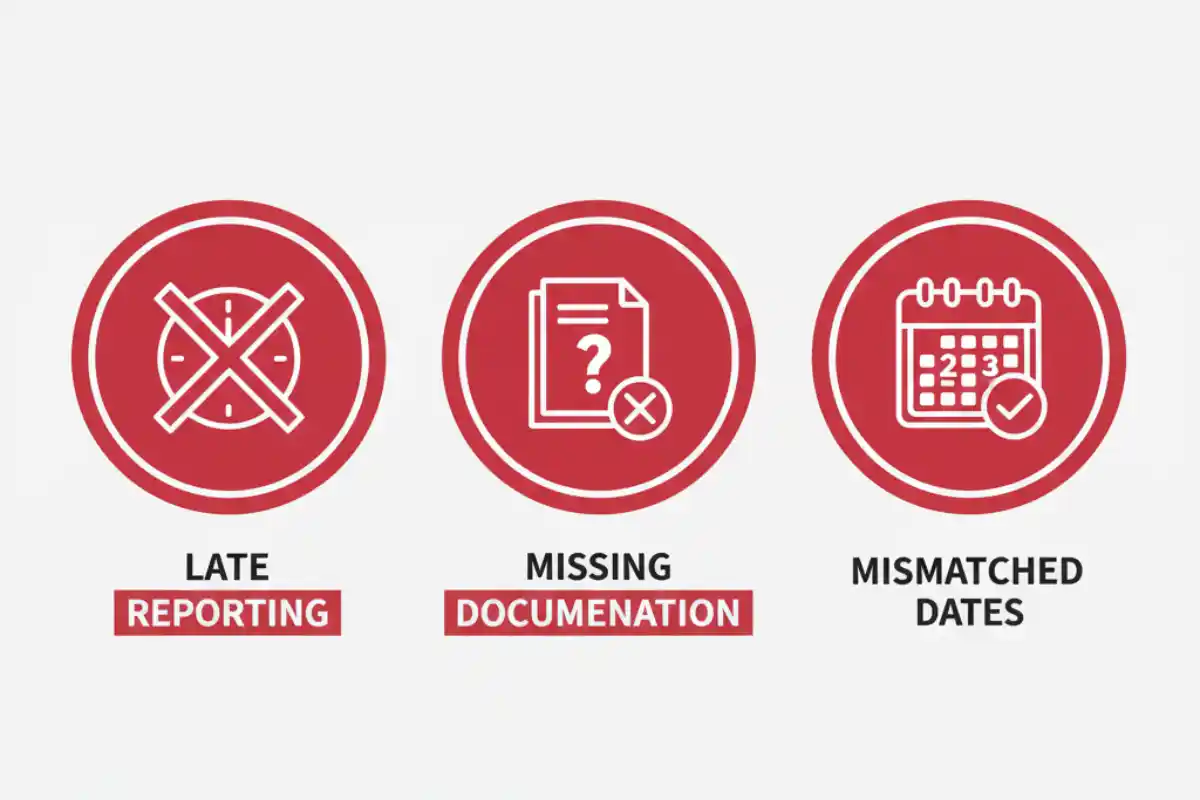
Common Rejection Reasons I’ve Seen (and Avoid):
- Late Reporting: Most policies require notice within 24–72 hours of the incident. Miss that, and you’re in gray territory.
- Missing Documentation: A $75 meal voucher isn’t valid without a copy of the flight delay confirmation.
- Mismatched Dates: If your medical report is dated before your policy start date — even by a few hours — the claim might be invalid.
My Golden Rule: Email your insurer immediately after the incident.
Even if it’s just a one-liner —
“Hi, I’m insured under Policy #XYZ. My flight just got canceled by Delta due to a mechanical fault. I’ll be filing a claim once I return. Please advise if any documents are needed.”
That email becomes a timestamped record of first contact, which satisfies the early-notice clause in most policies. I also BCC myself and archive it in my “Claim Docs” folder.
Small action. Massive payoff.
The Ultimate Tech Tool: Building Your Cloud Vault
You can capture every receipt and document perfectly, but if you can’t find them when it’s time to submit your claim, it’s as good as not having them at all. Organization isn’t optional — it’s the final filter between a smooth payout and endless email threads with your insurance company.
This is where I bring everything together into a centralized, cloud-based vault. Think of it as your personal claims dashboard — one that’s pre-sorted, labeled, and ready for submission before the adjuster even asks.
Recommended Cloud Vault Structure
For every trip I take, I set up a simple folder tree in Google Drive (you can use Dropbox, OneDrive, or iCloud — whatever you’re comfortable with).
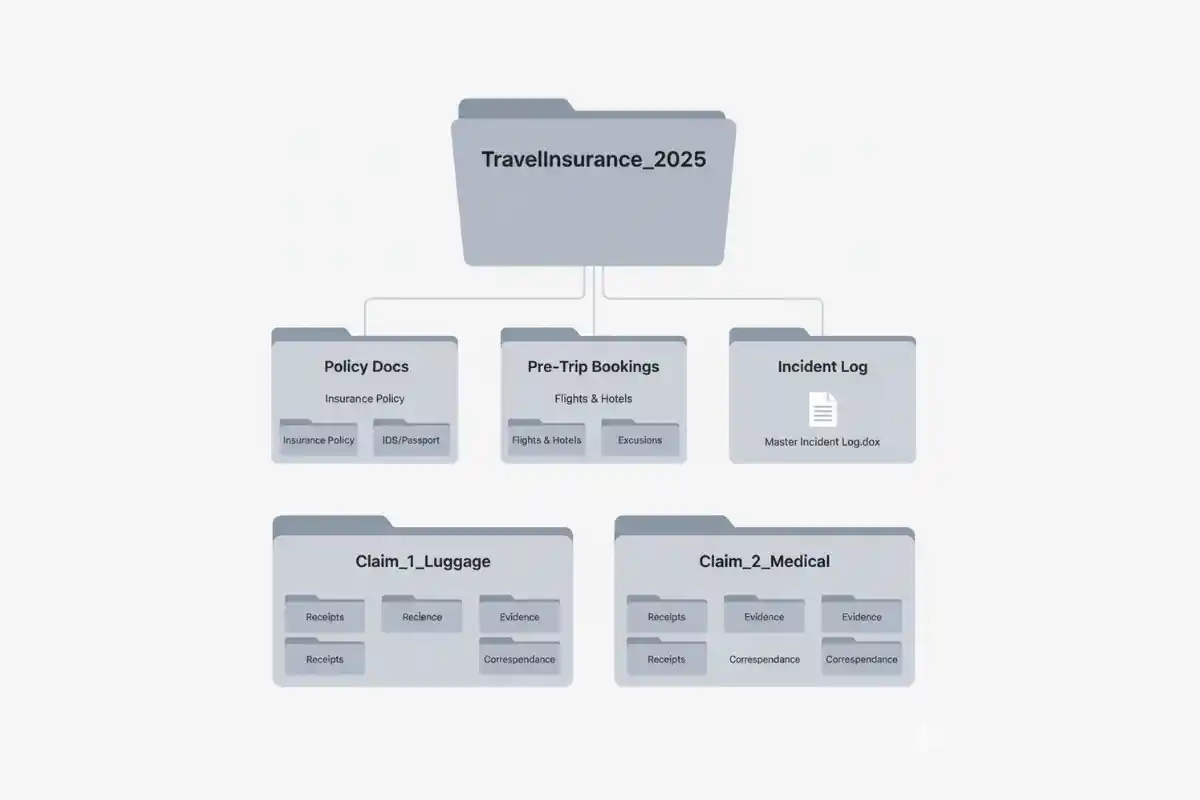
Here’s my exact structure:
/TravelInsurance_2025/
├── Policy Docs/
├── Pre-Trip Bookings/
├── Incident Log/
├── Claim_1_Luggage/
├── Claim_2_Medical/
- Policy Docs: Your full insurance policy PDF, customer number, contact info, and any policy summary the company sent.
- Pre-Trip Bookings: Flights, hotels, excursions — anything you pre-paid.
- Incident Log: The master incident log document you’ve been maintaining (from Section II).
- Claim folders: Separate folders for each issue (lost bag, injury, flight delay) — each one with relevant receipts, forms, photos, and letters.
This structure mirrors how insurance teams process claims internally. It makes your submission faster to review and harder to reject.
The Final Submission Play: Leveraging Docs for Clarity
When it’s time to submit, here’s how I compile everything into a clean, professional package:
Step 1: Merge by Claim Type
For each incident (e.g. luggage loss), I combine:
- All receipts
- Photos
- Official letters
- Related notes
…into a single PDF file using tools like Adobe Acrobat, PDFsam, or even Google Docs (exported as PDF).
Each PDF is named clearly: Claim_1_Luggage_Loss_2025.pdf
Step 2: Create the Cover Letter & Index
I take my Master Incident Log (Google Doc) and:
- Review + finalize all entries
- Add hyperlinks if needed
- Export it as Log_Master_2025.pdf
This becomes the cover letter and navigation guide for the adjuster.
Step 3: Package for Submission
I create a single folder with:
- Log_Master_2025.pdf
- All merged claim PDFs
- Policy summary, supporting docs
Then I compress it into a .ZIP file and name it clearly: Insurance_ClaimBundle_2025.zip
Finally, I send it via email or upload it through the insurer’s claims portal (most accept Drive/Dropbox links now). This way, I control the narrative, and nothing gets lost in translation.
Pro Tip: Before uploading, I double-check that every PDF is readable, links work, and filenames are clear. This 10-minute review has saved me weeks of back-and-forth later.
When your submission looks like it came from an internal audit team, adjusters don’t ask questions — they just approve it.
Conclusion: Think Like an Auditor, Not Just a Traveler
If there’s one thing travel insurance has taught me, it’s that being organized pays — literally. The difference between getting your full payout and getting ghosted by your insurer often comes down to who has the cleaner digital paper trail.
Just like recovering from an online setback — for example, What Should I Do After Instagram Hack success depends on quick action, proper documentation, and keeping calm under pressure.
According to a 2023 Statista report, 40%+ travelers avoid filing claims due to paperwork stress or fear of rejection — even when eligible.
You don’t need insider contacts or negotiation skills. You just need receipts that speak for themselves, photos that carry timestamps, and a vault that tells a clear story.
The best travel insurance? A clean, timestamped, digital paper trail.
When your submission looks more like an audit report than a pile of attachments, claim approvals become frictionless.
It’s not paranoia. It’s process. And it gets you paid.
So before your next trip, open a new folder.
Name it after your destination.
Start building your digital vault — before you even book the flight.
Because the smartest travelers aren’t the luckiest ones — they’re the most prepared.